When you go to websites or webpages, you will frequently see buttons popping on the screen that usually says ‘Download,’ ‘Click Here,’ ‘Contact Us,’ and so on. Clean, bright colors and gradients are used frequently in Web 2.0, which has become the prevalent and accepted style for modern web design. Using big, 3D buttons that draw the user’s attention is a crucial visual signal of Web 2.0 design. Buttons can be used to advertise a sale, Contact Information, or a phrase like “Free Netflix!” while also persuading the user to click and proceed to the desired location. Buttons are much more impactful than links on a website because they ensure that the viewer sees the button clearly and does not scroll by without noticing it.
You can learn to create such buttons on Photoshop with some practice, accompanied by the instructions we will lay out here. This Photoshop article walks you through the process of creating a basic and clean button sprite in the “Web 2.0 style” that features a rollover state.
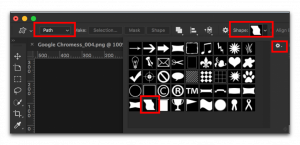
The first step is to find a good resource for styles that you can explore. The downloaded resource zip file should be uploaded in Photoshop. To demonstrate more clearly here, specific dimensions will be used. The button here will have a width of 250px and a height of 50px. To fit both the “idle” and “rollover” positions, double the size (100px). Move a guide to the 50px mark to make a clear line between the top half of the document and the bottom half. Go to View and see that ‘Ruler’ is checked to ensure that Rulers are turned on. Then, drag a horizontal line from the Ruler to the middle of the page (50px marker).
Start by setting the radius of the rounded corners to 3px and turn on the Rounded Rectangle Tool. Move the shape so that it covers the top half of the page. As you’ll soon see, it doesn’t matter what color the shape is. This shape’s width should be 250px, and its height should be 50px. You can select the area around the rounded rectangle shape by holding down Ctrl and clicking on the shape layer. Make a new layer and call it “Idle” while the selection is still on. Then you can fill the selection by going to fill in Edit while the new layer is active.
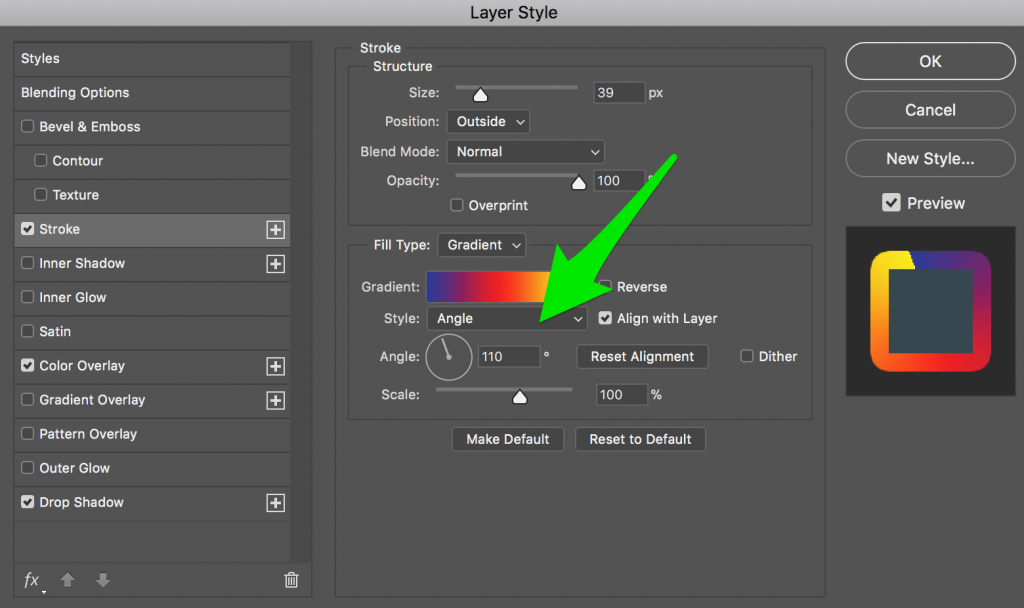
Now it is time to add some layer styles by double-clicking on the idle layer in the layer stack. Include a Gradient Overlay in your image to access the Layer Styles dialogue box. To access the Gradient Editor Dialogue box, double-click on the Gradient that you want to edit. You can set your required Color Stops for the right, left, and midpoints by adjusting. You can also add inner shadows and edit blending and opacity. For this guide, the Blending will be set to Normal and Distance and Size to 2px.
You can enhance it even more by adding gradients. Make a new layer above the Idle layer and call it, let’s say, radial gradient. Change the color of the background. By holding down Ctrl and clicking on the Idle layer, you can make a selection around the rounded rectangle shape. Then go back to the layer called radial gradient. Then, use the Gradient Tool and change the style of the gradient to a radial gradient. When you click on the gradient, the Gradient Editor box will appear. Select the Foreground to Transparent Preset in the Gradient Editor dialogue box. Make sure that the rounded rectangle shape is still selected and that the Radial Gradient layer is the active one. Once again, check to see if Rulers are on. Drag from the top of the selection to about 30px below it while the Gradient Tool is selected. Lastly, set the Radial Gradient layer’s opacity to your desired level.
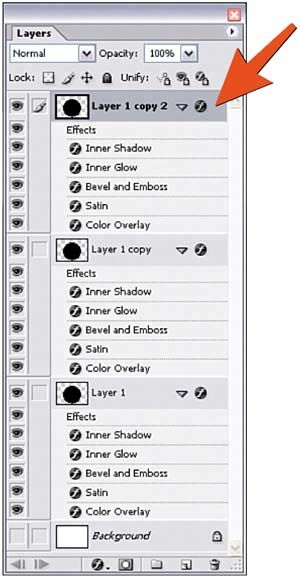
To create the rollover state shape, first duplicate the Idle and radial gradient by clicking on each one while holding down the Shift key, then right-clicking to open the context menu. Choose Duplicate Layers from the drop-down menu. Click on the duplicated layers in the Layers palette and then use the Move Tool to move them to the bottom half of the document.
They should be renamed, for instance, Rollover for Idle copy and radial gradient rollover for the radial gradient layer. Everything will stay the same except for the colors. Double-click the Rollover layer, and the Layer Styles dialogue box will appear.
The penultimate step is to add the text. You can choose the font style, size, alignment, and added effects. After duplicating the text layer for the rollover state, you will be done with creating the button on Photoshop!
Having more than eight years of experience, Deepak Chaudhary is well versed in planning and prototyping new applications. Deepak Chaudhary is on the Website Developer team. As part of his many operational duties at JDM Web Technologies, Deepak Chaudhary oversees web development and builds the company culture. With a background in design and development, Deepak Chaudhary has the unique perspective of creating a website. Deepak Chaudhary started programming in 2010 and became an experienced web designer. He is well known for testing the site and applying different browsers. He has been are often involved with the designing and appearance of a website.

Copyright © 2009-2024 JDM Web Technologies. | All Rights Reserved.

TOP